

Ahhh, how good it feels to be posting recipes again.
It’s fun in my house, the way we experiment with food. I mean, sure, I collect magazines to learn how to cook and all, but there’s nothing better than having someone to conspire with. It just makes you that much more adventurous.
And, one morning, I decided to do just that.

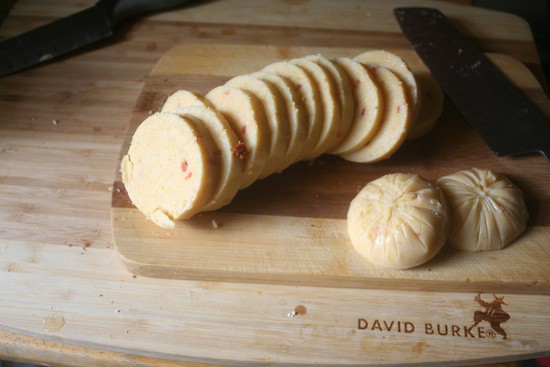
I picked up a roll of polenta – not quite that kind – from a local purveyor at the store, and hadn’t used it yet. It didn’t have any fat in it, and was made specifically for cutting into slices.
I’ve always felt guilty about the way I made my grits – I add heavy cream, any cheese I’m particularly interested in that day, and – depending on the recipe – butter. Basically, the way I make them… I can’t eat them often. But, I thought to myself, what if I make the grits with nothing but water, cut it into slices, and lightly fry the outsides? Crispy and spicy on the outside, soft and chewy on the inside? Since we also had shrimp on deck from an earlier night – when it’s on sale, we go a little crazy and stock up – I figured I could stack the plate.
Adventure time.
So.
I grabbed my roll, and sliced up into medallions that were about a third of an inch wide. If you stacked about five quarters on top of each other, that’s about how wide these were sliced.
Grab your pan, and about a third of a cup of organic canola oil. I’m a big fan of canola oil, but it must always be organic. Otherwise… we can’t be friends.
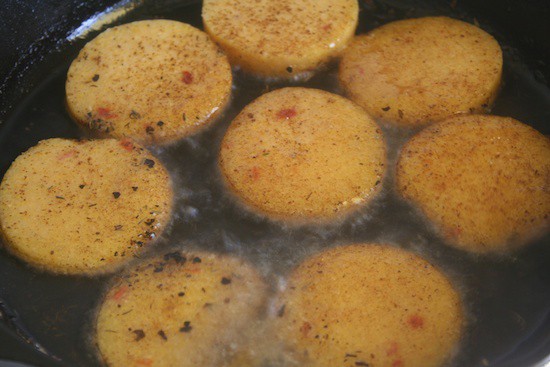
Pour half of your oil into your pan while it’s cold, then raise the temperature to a little bit above medium-high. On a scale of 1-10, I’d say a 7. Pick up your skillet and move it around a bit, to ensure that the oil is coating all of your
Once your oil is hot enough to start crackling a bit, drop your cakes into the skillet. That’s right. without seasoning. Stop jumping ahead!
If I can avoid seasoning things before I put them in oil, I try to do so. Since you’re essentially par-frying them (par-frying is basically partially frying, as opposed to “deep frying” which is fully submersing something in oil and cooking it all the way through), you don’t want to burn your spices or herbs. That can be beyond unpleasant.
After about 5 minutes, check on the bottom of one of your cakes. Lift one slowly with a spatula. If it starts to crumble upon lifting or if it lifts but isn’t browning, then wait another five minutes before you check. After five minutes, when you check again, they should be closer to browning on the edges. Once you start to develop that nice brownish ring around your cakes, check it for crisp. I, personally, let mine get a little darker around the edges and use that as my gauge for how done it is throughout the entire bottom of the pan. Not too dark, otherwise it just starts burning. Again, unpleasant.
Once the crispiness is to your liking, Flip them over.
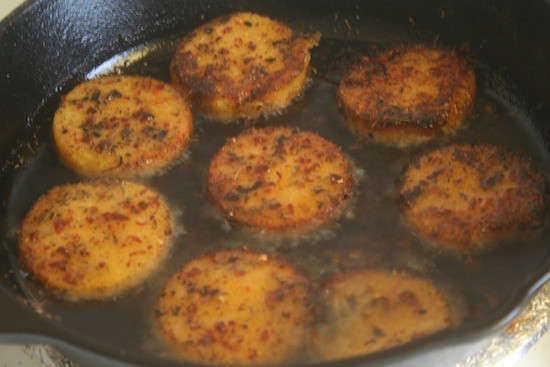
Now…it’s time to season.
A tablespoon of paprika, a tablespoon of black pepper, a tablespoon of crushed red pepper, a half of a teaspoon of fine ground sea salt, a teaspoon and a half of thyme and a teaspoon and a half of cumin all in a little bowl together. Using your fingers, mix the spices together in the bowl, and sprinkle it all across the skillet. Not specifically targeting the cakes, but instead just aiming to cover the skillet in spice.
Don’t use more than a fourth of the entire spice mixture, because you need to flip your cakes one more time and cover the other side, then you also need to cover the rest of the slices that you haven’t cooked, yet.
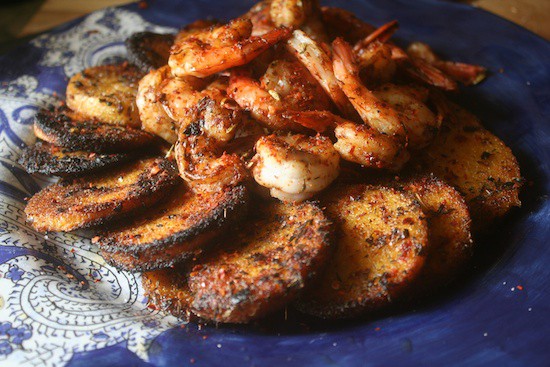
Flip your cakes, season them immediately, then pull them out and start stacking them on the plates, like so.
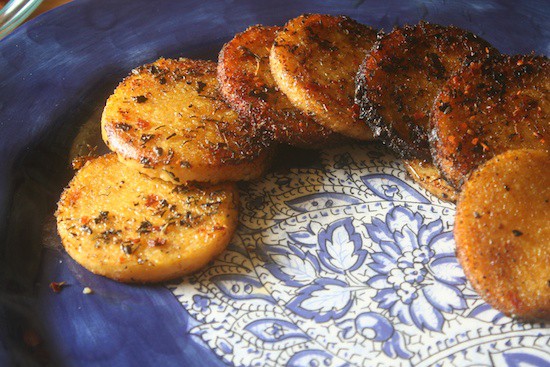
Look at you, all fancy and stuff.
By my approximation, you should’ve only been able to cook half of your medallions at once, so go ahead and repeat the entire process for the other half of your stash. Same thing – the only difference is that you’ll be pouring your oil into a hot pan. Do this, but do it carefully. I pour my oil down the side of the pan, so as to best avoid splatter.
Don’t worry. I’ll wait.
If you like, you can place your cooked medallions in a toaster oven on low heat to keep them warm while the rest of the dish cooks.
While this second half is cooking, it’s time to start prepping your shrimp. I used a pie plate for this because, well, I’m lazy and it was too far of a reach for me to actually grab something that could’ve been useful for this. Blah blah blah, make sure you have everything you need in front of you before you start cooking, blah blah blah, it’s called mise en place, blah blah blah, save time, blah blah blah, don’t be like me.
Okay. Anyway.

Take 1 tablespoon of fennel seed (that’s the stuff you see that looks like, well, seeds), a teaspoon of cumin, two teaspoons of paprika (smoked, if you can swing it), a teaspoon of black pepper (a third if it’s from a grinder), and a half-teaspoon of ground clove and just douse your shrimp with it. Try to evenly cover the entire plate with all of your spices.
While you’re prepping your shrimp, you’re also keeping an eye on your cakes and spicing them appropriately. When they’re done, plate those, too.
It really doesn’t matter how you spice them and, no, it doesn’t matter whether you cover both sides of the shrimp because they’re all going to be tossed into the skillet together and turned on top of each other, which is where spices will rub off everywhere. Mmmmmm. Nummy.
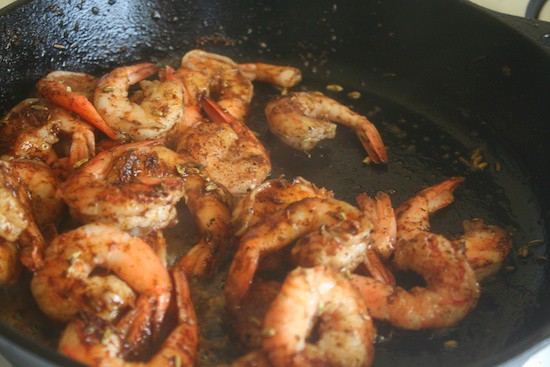
If there’s a ton of oil in your skillet after you cook your last batch of cakes, then pour it out (and store it, if that’s your thing) and put the skillet back on the stove. When you toss your shrimp into the skillet, be sure to consistently toss them around the skillet with your spatula. The minute they stop looking so translucent and start looking a bit more solid, more opaque, they’re 90% done. Keep your eyes peeled very carefully on them, turn your stove off, and make sure all of your shrimp have no translucent-looking parts. This is the best way to make sure you don’t overcook your stuff.
You really don’t want rubbery shrimp. It’s just… again. Unpleasant.
As soon as your shrimp is done, sprinkle a pinch o’ salt across the entire skillet, and give them one final toss.
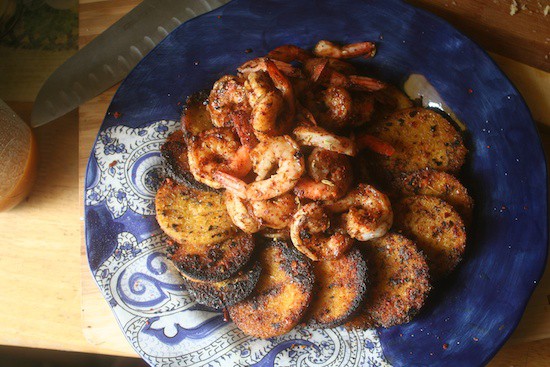
Start plating your food. Put your shrimp wherever you want them. It doesn’t matter… because it won’t be there very long, anyway.
After you finish your plating, take one final pinch of salt and sprinkle it across the entire plate. It might feel like you’re reaching for a lot of salt, but truthfully, when you use a lot of spices on something without properly salting it… believe it or not, your food becomes bland. It’s more like a flavor car wreck than free-flowing flavor traffic.
Don’t roll your eyes. You loved my metaphor.

Either way… go eat. Your medallions should be crisp on the outside, but fall-apart soft in your mouth. You want nice, big flavor on the outside, with hot and steamy goodness on the inside. Your shrimp should be flavorful, and should stain your fingers.
And, yes, I’m in full support of making this finger food. I made this plate, and the three of us sat around it and dug in together. Nothing more adorable than watching a toothless first grader bite into a little grit cake and smile.
Awww.
Spicy Shrimp and Polenta Medallions
For the medallions:
12 slices of grits
1/3 cup of organic canola oil
1 tbsp of paprika
1 tbsp black pepper
1 tbsp crushed red pepper
1 tsp of thyme
1 tsp cumin
1/2 tsp fine ground sea salt
For the shrimp:
1 lb of shrimp, extra large, peeled and deveined
1 tbsp fennel seed
2 tsp paprika (preferably smoked)
1 tsp of cumin
1 tsp of black pepper
1/2 tsp ground clove
a pinch of salt
Directions:
1) Heat your skillet, at 7/10 of its heating ability. Mix your spices together in a separate bowl.
2) Par-fry half of your grit cakes at a time, seasoning them after they’ve been flipped. When one batch is finished, begin cooking the second half.
3) Season your shrimp on a separate plate.
4) After cooking all of your cakes, cook your shrimp.
5) Plate your food.
6) Eat up.
Enjoy!